Havirland, knit, Knitting, socks, Tutorial

Self-striping socks

IMG_9676.JPG

Hi there!

Long time, no see! Hopefully now that the PhD is 99% done I’ll have more time to post here. Today I wanted to talk to you about my newly found love of self-striping sock yarn. It’s no secret that I’ve been obsessed with knitting socks since I knit my first pair, but despite my love for stripes I wasn’t convinced they would work well in socks.

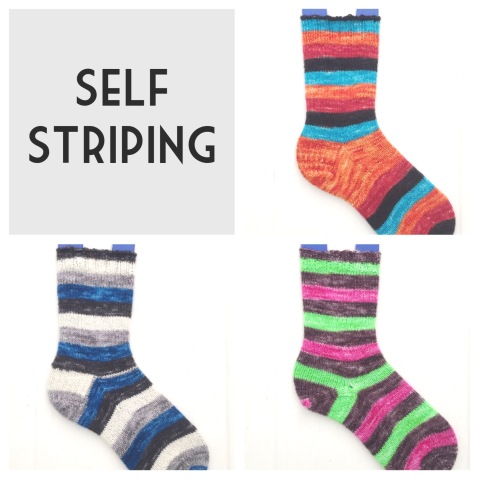
I finally took the plunge when my amazing friend Carol, AKA Havirland dyed her first batch of self-striping yarn. The question was how to approach the heel. There are many kinds of heels one can use in socks. I typically knit mine top-down using a heel flap. But instead of going that way, I took the opportunity to learn the afterthought heel. The result is pictured below.

IMG_9680.PNG

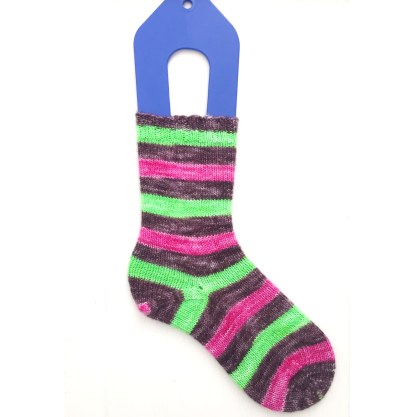
Yarn: Havirland Pax Sock “Ecto Floral” self-striping.

Pattern: top-down sock, 56 stitches in 2.25 mm needles, afterthought heel.


I like the look of this heel but unfortunately it doesn’t fit my feet as well as a traditional heel flap, so for round 2 of self-striping I chose to knit socks with a flap. I happened to have some “Lady Orange” yarn also from Havirland, so I was able to match it to the orange of one of the stripes in “Godzilla in Paris”. I get 8 stripes per color for this yarn so I knit 4 rows, switched to Lady Orange and knit the heel, gusset and decreases. I then switched back to the main color. The result is pictured below.


IMG_9682.PNG

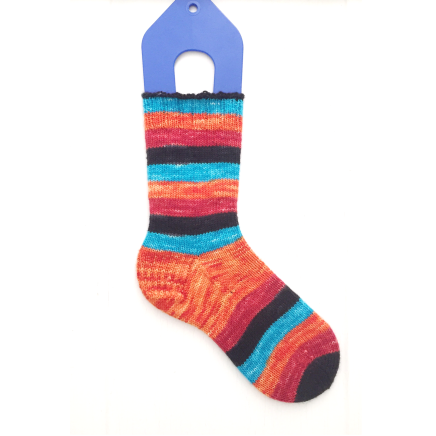
Yarn: Havirland Pax Sock “Godzilla in Paris” with a heel in “Lady Orange”.

Pattern: Top down, 56 stitches in 2.25 mm needles, coordinating heel.


I love this combo! However, it is unlikely that I’ll always have yarn to coordinate with my self striping, even considering my huge Havirland love. So I also knit a sock with a regular flap heel, knit continuously with no extra yarn whatsoever and only 2 ends to weave! The result is pictured below.

IMG_9681.PNG
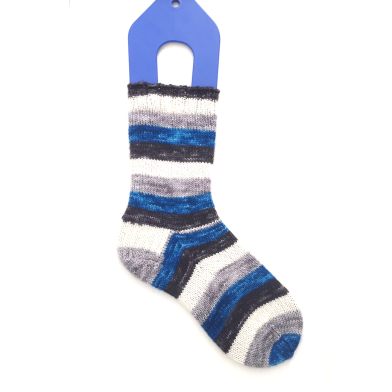
Yarn: Havirland Pax Sock Self-striping “This are not the droids you’re looking for”

Pattern: top-down, 56 stitches in 2.25 mm needles, traditional heel flap.


I hope this experiment is useful to you if you decide to take the plunge into self-striping yarn. Let me warn you, it’s addictive!


Standard
accessories, free pattern, Havirland, Knitting, Shawls

Havirland Minis shawl pattern

IMG_6825

Although I knitted this shawl for Halloween, it’s the perfect accessory for yarn minis you may have accumulated or want to buy. Mine was made with Havirland Yarns Halloween minis and some folks on instagram (@nanoadri) have asked for the pattern.

You can download it on Ravelry as the ‘Havirland Minis Shawl’ by Adriana Bon (Revelry ID: nanoadri). I would love to see any shawls you make from this pattern! Don’t hesitate to contact me for questions via Ravelry message or email at bowtiesfezzesblog@gmail.com

Enjoy!

IMG_6762

Standard
halloween, knit, Knitting, socks

The joy of socks

Halloweensocks

A couple months ago I knit my first sock. It was difficult and I was not convinced I was really into it. A lot of patterns are cumbersome and don’t properly explain why or how one goes about making a sock. Then came the ‘Rose City Rollers’. A simple, well explained, addictive and FREE pattern by a lovely lady who inspires me on a regular basis, Mara, aka Orangeknits.

The rollers made me fall in love with sock knitting. I am told this happens quite often. Weird as it sounds, making socks to me is like making protein. When I am frustrated in the lab because new experiments won’t work, I make protein. I still remember my first prep, which took me forever and seemed extremely difficult. Now it’s one of those few things that bring me instant gratification. Socks have become the go to knit for when I’m feeling uninspired or simply too exhausted to take on a complicated pattern.

rosecityrollers

I’m a fan of simple patterns that highlight amazing yarns. One of my current favorite dyers is Havirland, aka, Carol. She’s another one of those wonderful people I’ve come to know through instagram (yay for good social media). Her yarns are fun, unique and often pretty nerdy. She is as much a fan of Halloween as myself and so she makes fantastic spooky color ways. When I saw her Halloween minis set, I knew I had to get it and make a pair of socks with it.

hallosocks

I consider these socks to be the best thing I’ve ever knit. Not just because I’m extremely happy with the final product (see first picture), but also because they made me realize I can actually combine colors/variegated yarn in a pleasant manner. – I have always told myself and my husband, I had no idea how to combine colors. I called it being ‘color impaired’. But no more. I am now ready to tackle a million more colorful projects and see where my instincts take me.

In the meantime I’ll dream of Halloween.

PS. My halloween socks are 56 stitch rollers with a longer leg (7 inches) and a 3×1 ribbed cuff that measures about 1.5 inches (20 rows).

Standard
Food, knit, Knitting, Madelinetosh

Shawls and cornbread

Life has been a bit insane as of late. Grad school is at the final stages. The hubby moved to Maryland for a job. I have been working as much as I can and eating and knitting during every single little break. As a result, here are 3 shawls and a delicious cornbread recipe that I have now made a dozen times and never fails. Variations are endless.

photo 1 copy

Citadel by Janina Kallio  knit in Duck duck wool silky singleton

photo 3-2 copy

Another Janina Kallio pattern, Orbit. Knit in Madelinetosh tosh DK

photo 4 copy 2

Finally, Neato shawl by Jumpercablesknitting. If you’re wondering why mine doesn’t have stripes of holes all the way across, it’s because I skipped row 13. The yarn is Malabrigo arroyo in Marte color way. Absolutely love this yarn!

Last, but not least, Sean Brock’s cornbread. It’s out of this world good.

photo 4 copy

Standard
Uncategorized

Yarn dyeing and Easter bunny making

Easter bunny FO edit1

Hi there!

Did you all have a good Easter last week? I hope so! I must confess I love American Easter. Why ‘American’ you say? well, the typical American Easter has little to do with the more religiously oriented Spanish traditions. In Spain you’ll find no bunnies, no Easter egg hunts or Easter baskets filled with goodies. Sounds a bit boring, doesn’t it?

Since I am a bit too old to go on an egg hunt myself, I wanted to make something for my friend’s toddler. I also wanted it to be a sugar free long lasting gift, so I decided to crochet some eggs and a bunny. They are both FREE PATTERNS: Bunny pattern and Egg pattern

easter bunny and eggs

To make it even more Easter-y, I dyed the yarn myself using food coloring. Now that Easter is over you probably have some food coloring laying around yourself. I encourage you to dye some yarn with your little ones using this tutorial. This process is fun and safe. Non-toxic, environmentally friendly and cheap! Here is my resulting yarn:

dyed yarn

How to dye yarn with food coloring

Supplies needed:

– Gel (or liquid) food coloring. I used the gel in 4 colors, red, green, blue and yellow

– White vinegar

– Undyed wool yarn. I used Patons superwash DK. 2 skeins worth. You can easily find it at JoAnn’s or Michaels. (Non protein fibers like cotton or acrylic will not dye with this method)

– A pot or pan to ‘cook’ the yarn and a container to soak it.

– Ball winder or some other method to turn your ball yarn into a cake. *

*Note: you can dye your yarn in whatever shape or form you like. Most tutorials you’ll find out there use a skein that is made into a circle using a niddy noddy. I chose to dye my yarn this way because I wanted a variation in color between the inside and outside of the caked yarn. You may choose to keep the yarn in a ball or to make it into a circle.

Instructions:

dyeing


1. If you chose to cake your skein, do that first. I used one of my skeins full, to be used for the bunny and the other I split into 5 mini-cakes to be used for the crochet eggs.

2. Soak the yarn in a water + vinegar. You will need  1/4 cup of vinegar for every 4 cups of water. The vinegar is absolutely required. Why? I will save you the exact chemistry but vinegar is an acidic compound. In order for the chemical groups in wool to react with the chemical groups in the dye, the pH of the yarn has to be low. That is, you need slightly acidic yarn. In order to achieve this you’ll want to soak the yarn for at least 30 min.

3. While you wait, mix your dyes. Keep in mind there is a limit as to how much dye will be dissolved in water. I made my dyes in saturating conditions. This means I add as much dye as the water can dissolve. This gives very intense colors. I mixed my dye and water in small bottles I have, but you can do it in any container you’d like.

dyeing1

4. Add the dye! For my speckled yarn, I added teaspoons of dye mixture in a more or less evenly distributed manner. Starting with the darker colors and finishing with the light ones. You may choose to do this in a different order. For the single color yarn, I placed my mini cakes in small mason jars and poured the dye on top. When I was satisfied with the color I poured the dye off and filled the jars with clean water.

dyeing2

5. ‘Cook’ your yarn. In order for the dye to remain chemically attached/linked to the yarn, it is necessary to increase the temperature of both. We do this by placing the yarn directly in a pot with water (that’s what I did with the speckled yarn) or by placing it in jars that are then placed inside the water (top left corner picture). I reacted my yarn for 1 hr at 170F / 90C. Right below boiling. You want the ‘cooking’ process to be gentle so the yarn doesn’t felt.

6. Once the yarn is dyed, rinse it with cold water. I chose to also soak it in water with a tiny bit of Eucalan/hair conditioner. I really do mean a tiny bit. This will fix any slight felting that may have occurred during the dyeing process.

7. Let the yarn dry! I let my small cakes dry wrapped in a towel (bottom left picture) and the large cake spread over the towel. You’ll want to aim for an overnight dry.

8. Make your bunny and eggs or whatever other colorful creation you’d like.

hand dyed easter egg


I hope you enjoyed this tutorial!

Standard
accessories, DIY, hat, knit, Knitting, Madelinetosh, Madtoshlove

Off the needles: Madtoshlove

photo 1

It is no secret that graduate students tend to be quite broke. It comes with the territory and there is no point in discussing the merits or faults of graduate stipends. We’ll leave it at, it’s not much. For that reason, buying nice yarn is a treat. Skeins are few and far between and thus, they are treasured.

One way to get good yarn for the right price are stash boxes. I bought a destash box from a designer a long time ago. 40$ for about 16 skeins of different brands and colors. Among them was a skein of Madelinetosh vintage. Then and there, I was in love. I have since bought a couple skeins of her yarn, been gifted 2 and enjoyed them all. The resulting pile of Madtosh knits is pictured above.

I must also mention that Madelinetosh yarn is purchased from fair sources in Peru and South Africa and hand dyed in Texas. Supporting Texas businesses is something I do because I married a Texan and I have had the chance to visit the state and meet lots of lovely people there. I am also a strong believer in buying Made in the USA and supporting small businesses. So this is a win win!

Over the next couple of weeks, I’ll be posting about all these finished objects. Including an improvised pattern for the cowl at the bottom of the pile. But for now, let’s get started with some hats!

photo

The hat on the left top corner was meant to be a Barley hat from Tin Can Knits , did I mention it’s a free pattern? It was one of my first knit hats and I didn’t do the best job at following the pattern. Oops! That does not stop my husband from wearing it very often. The yarn is the skein I got from the destash box and it’s Tosh Vintage in Earl grey color way.

The hat next to it is the Happy Happy Joy Joy hat from Heyladyhey. It is a soft and squishy hat. It embraces your head perfectly and it is truly a joy to wear. This one was knit in 80/10/10 Worsted in Tannenbaum. I got this yarn as a limited edition special for Black Friday. What a great purchase, don’t you think? The yarn is 80% merino, 10% cashmere and 10% nylon. Unfortunately it is not usually in stock but you may be able to find it on rare occasions. Here’s another picture of the finished hat:

photo 4

The last two hats may look familiar to you if you follow the blog as I have posted about them previously. The one on the bottom left is the Close Cables Hat by Pickles. It is a free pattern and I knit it in Tosh Chunky in Jade color way. The one on the bottom right is Sand Bank by Justyna Lorkowska and it was also knit with 80/10/10 worsted in Tannenbaum.

Stay tuned for the next post, where I’ll show you tons of pictures of the shawl at the top of the pile, perfect for spring. In the meantime, treat yourself to a skein of Madelinetosh, you’ll thank me later!

Standard
accessories, cowl, crochet, DIY, Pattern, photo tutorial, Tutorial

Crochet in the third loop and a chunky faux-ribbed cowl

crochet chunky cowl

Have you been looking for a good alternative to knit ribbing in crochet? look no further! The newest installment of…

Learn to crochet

is here!

Today we’re talking about crocheting in the third loop. This technique is great to achieve a ribbed look and it comes with a free pattern for a chunky, warm and cozy cowl.

IMG_0059

First, let’s talk about Crochet in the third loop! or rather, let’s visualize how to accomplish it, step by step!

1. First you’ll need to make 1 round of plain old Half double crochet

third loop after 1 round of hdc

2. Take a look at your work. From now on, you will not be crocheting the next round as usual. Instead you will use the third/side loop as marked in blue

photo 1 (9)

3. Just to emphasize, you will not crochet at the top loops as you would normally do.

third loop not crochet here

4. Now wrap the yarn around your hook as you would for normal HDC and then insert the hook into the third loop

photo 2 (10)

5. The top view looks like this

photo 3 (8)

6. Finish your stitch as usual, wrapping the yarn around the hook once more and pulling it through all remaining loops. You are now done!

photo 4 (2)

Now let’s go for THE PATTERN!

For this I used 2 skeins of super bulky yarn and a 12 mm crochet hook, plus 2 buttons 3/4″ in size

make 56 chains

HDC in each stitch, starting at 2nd chain from hook

chain 1, make 1 hdc in the third loop in every stitch

Repeat for another 13 rows. You will now have 7 ribs in your cowl.

chunky cowl

Standard
accessories, crochet, DIY, kitchen and decor, Pattern

‘Mug my heart out’ coffee mug cozy

heart mug

Hi there!

Ready for Valentine’s day? This year I was in the mood for some bright colors and a bit of polymer clay for my Valentine’s project. This mug cozy is unbelievably quick. 30 min start to finish. It has some hearts for embellishment, which are equally simple. You can make a ton of them to give away with crocheted/knitted gifts any time of the year (my friends/relatives love it!). Instead of using a plain button, I made my own with polymer clay. You will be seeing a lot more clay projects in the blog from now on. Yay for clay!

Can’t get enough? Check out last year’s Valentine’s project, my heart earflap hats! 

In the meantime, enjoy this pattern and have a love-filled Valentine’s day!

heart mug back

Cozy pattern

With 5 mm crochet hook and acrylic worsted weight yarn (I used Michaels’ Loops and threads in red)

Rd1. 6sc
Rd2. 2 sc in each st (12 sc)
Rd3.(2 sc in first st, 1 sc in next) around (18 sc)
Rd4. (2 sc in first st, 1 sc in next 2 st) around (24 sc)
Rd5: (2 sc in first st, 1 sc in next 3 st) around .(30 sc)
Rd6: (2 sc in first st, 1 sc in next 4 st) around (36 sc)
This completes the base of the cozy

Rd7: sc in each st around in back loop ONLY! (36 sc)
Rd8: sc in each st around in both loops (36 sc).
Rd9: sc in each of the next 32 st. Now you’re leaving the gap for the handle. From now on you’ll work in rounds. Turn, chain 1.
Rd10-21: sc in each of the next 32 st. Turn, chain 1.

Now single crochet along the handle gap. At the end, chain 21 then slip stitch through the first chain to make a closed loop.

————————————————————————–

Funda de taza

Empezar con un círculo mágico. Trabajar en espiral (sin unir las vueltas con punto raso) hasta que se indique lo contrario

  1. Hacer 6 puntos bajos en el círculo mágico – 6 pb
  2. 2 puntos bajos en cada punto de la ronda anterior – 12 pb
  3. (2 pb, 1 pb) * 6 – 18 pb
  4. (2pb, 1 pb, 1pb) * 6 – 24 pb
  5. (2pb, 1pb, 1pb, 1 pb) * 6 – 30 pb
  6. (2pb, 1pb, 1 pb, 1 pb, 1 pb) *6 – 36 pb

Esto completa la base de la funda

  1. Pb en la lazada/hebra de atrás en cada pb de la vuelta anterior – 36 pb
  2. Pb en cada pb de la vuelta anterior – 36 pb
  3. Pb en los 32 pb siguientes (de esta forma dejamos un hueco para el asa de la taza) – a partir de ahora trabajaremos en vueltas montando una cadena al principio de cada vuelta, es decir, no trabajamos en espiral
  4. -21 Montar 1 cadeneta, pb en cada pb de la vuelta anterior, dar la vuelta – 32 pb

Al final de la vuelta 21, montar 22 cadenetas y unir la ultima cadena a la primera con un punto raso.

Heart pattern

Gauge is not important. The larger the hook the larger the heart. I used a 3.5 mm hook with Caron simply soft solids in pink.

{1} chain 3 in magic circle

{2} 3 trc

{3} 3dc

{4} chain 1

{5} 1 trc

{6} chain 1

{7} 3 dc

{8} 3 trc

{9} chain 2

{10} slip stitch at the first stitch to close the heart

for the larger heart, add another round

{11} chain 3

{12} 1 sc+1 hdc tog. in the 3rd chain of the 1st row

{13} 3 hdc tog.

{14} 2 hdc tog.

{15} 4 sc

{16} chain 1

{17} 1 dc in trc of row 1

{18} chain 1

{19} 4 sc

{20} 2 hdc tog.

{21} 3 hdc tog.

{22} 1 hdc+1 sc tog.

{23} chain 3

{24} slip stitch to end the 2nd row-

Patrón corazón

Heart polymer clay button

Take a small amount of red polymer clay and work it in your hands to soften it up. Roll it into a log. Add a small amount of white, pink or another contrasting color and roll the log in your hands to mix in the color in streaks. Once you’re satisfied with the streaks, shape it into a heart and flatten it out. Make two large holes (make sure the head of your darning needle can get through) and bake the heart according to manufacturer instructions. Sew heart onto the cozy using the same yarn you used for the body of the cozy.

Standard
Amigurumi, crochet, Pattern, Review

Garden dolls and panda plush (free pattern)

garden dolls


If you read this blog with some regularity, you know I’m big into the site ‘Cut Out and Keep’. There you can find tutorials for just about any craft and recipes to make your belly happy. The wonderful Cat, who runs the site, asked if I’d like to participate in a book review/project test for the site.

The book chosen is Cute critter crochet and it is full of lovely amigurumi patterns. I was fortunate enough to receive a free copy of the book and get to pick two projects to test. The projects are Garden dolls and Panda plush and the patterns are available for free! 

panda plus


Although I was not asked to review the book, I’ll give you my 5 cents on it. The pros are super cute things to crochet with very detailed patterns that include both written and chart instructions. We all learn and crochet/knit differently, so I always appreciate having the instructions in both writing and charts. The cons, which are absolutely a personal preference, is the way in which the items are constructed. The patterns do include some crochet in spiral, but they also rely heavily on things that are crocheted flat and then sewn. I hate sewing parts together, so I was not thrilled to have to sew 12 pieces to make the panda.

In any case, I’m sure you’d like to try these patterns yourself! you can get them for free the Cut Out and Keep site. The Garden Dolls are here and the Panda plush is here.

garden doll flower

Standard
accessories, hat, Knitting, Pattern, yarn

Off the needles: Two cabled hats

photo 1 copy 2

I have just recently discovered cables. I have to admit I was afraid of cables for whatever irrational reason you can think of. The fact is that cables require patience, but they are not really difficult. It takes some practice and you can check out some tutorials here and here.

photo 1 copy

In order to practice my cables, I made first a hat for the husband and then one for myself. His hat is made with bulky yarn and mine with worsted. They both rely on 6 stitch cables that are worked differently for a different pattern. I found it good practice to make both hats and thus try several ways of cabling 6 stitches. The result is quite different!

photo 2-3 photo 3-2

His hat has 6 stitch cables that are knit quite close together and make for a very squishy hat. By that I mean, your hat will appear to be too small to fit an adult head, but will fit your very large husband’s head perfectly well. The Close cables hat by Pickles is a treat to wear and a free pattern. I would recommend you knit very loosely on this one, as it uses size 5 mm needles and bulky yarn, plus cabling, so things are a bit tight. I found it rough on my hands. Some ravelry users complain it requires more yarn than Pickles recommends, but I used all of one skein of Madelinetosh chunky in Jade. I had a few yards to spare.

photo 2-3 copy photo 3-2 copy

Mine is the Sand Bank pattern from Justyna Lorkowska. I am in love with this hat. The yarn is Madelinetosh 80/10/10, which was her special for black Friday. Very few skeins of this yarn were dyed, so I had to put it to good use with a pattern that really enhances the tonality of the yarn. The hat is soft and squishy and it has just the perfect length. I love how well defined the offset cables are all throughout the hat, including at the decreases. It’s a very well thought out pattern and I really recommend it as extra practice for your cables!

Nobody paid me to say any of this, I didn’t receive a compensation or a free pattern. All of the opinions are mine and I really highly recommend you try the patterns if you are a beginner or even completely new to cables! Enjoy!

Standard